

Whether a multicolor press can print both sides of the sheet in a single pass usually comes down to one option: the perfecting configuration. On the used market, a machine fitted with a reversing unit normally commands a premium over the same model in straight printing, yet the transfer drum, storage drum and hydraulic clamping system are exactly the areas buyers overlook most — a machine that tests perfectly in single-sided mode may develop gripper-margin drift and sheet-loss alarms the moment it switches to two-sided work. Using the fully automatic reversing platform of the Heidelberg XL106 class and the Roland 700 perfecting device as examples, this article walks through the structure, the changeover sequence, the gripper-margin error rule and the maintenance evidence you should verify before signing.
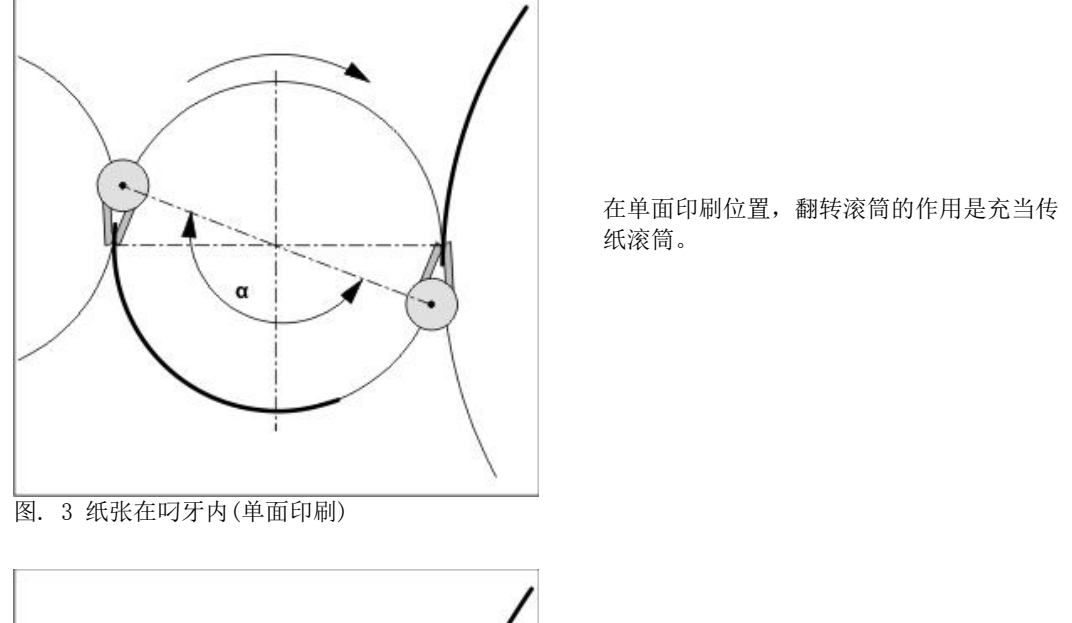
- The perfecting cylinder picks each sheet by its trailing edge from the storage drum using clamp grippers; the bar carries 19 gripper pairs, each with a fixed jaw and a spring-loaded jaw. In single-sided mode it simply reverts to a transfer drum.
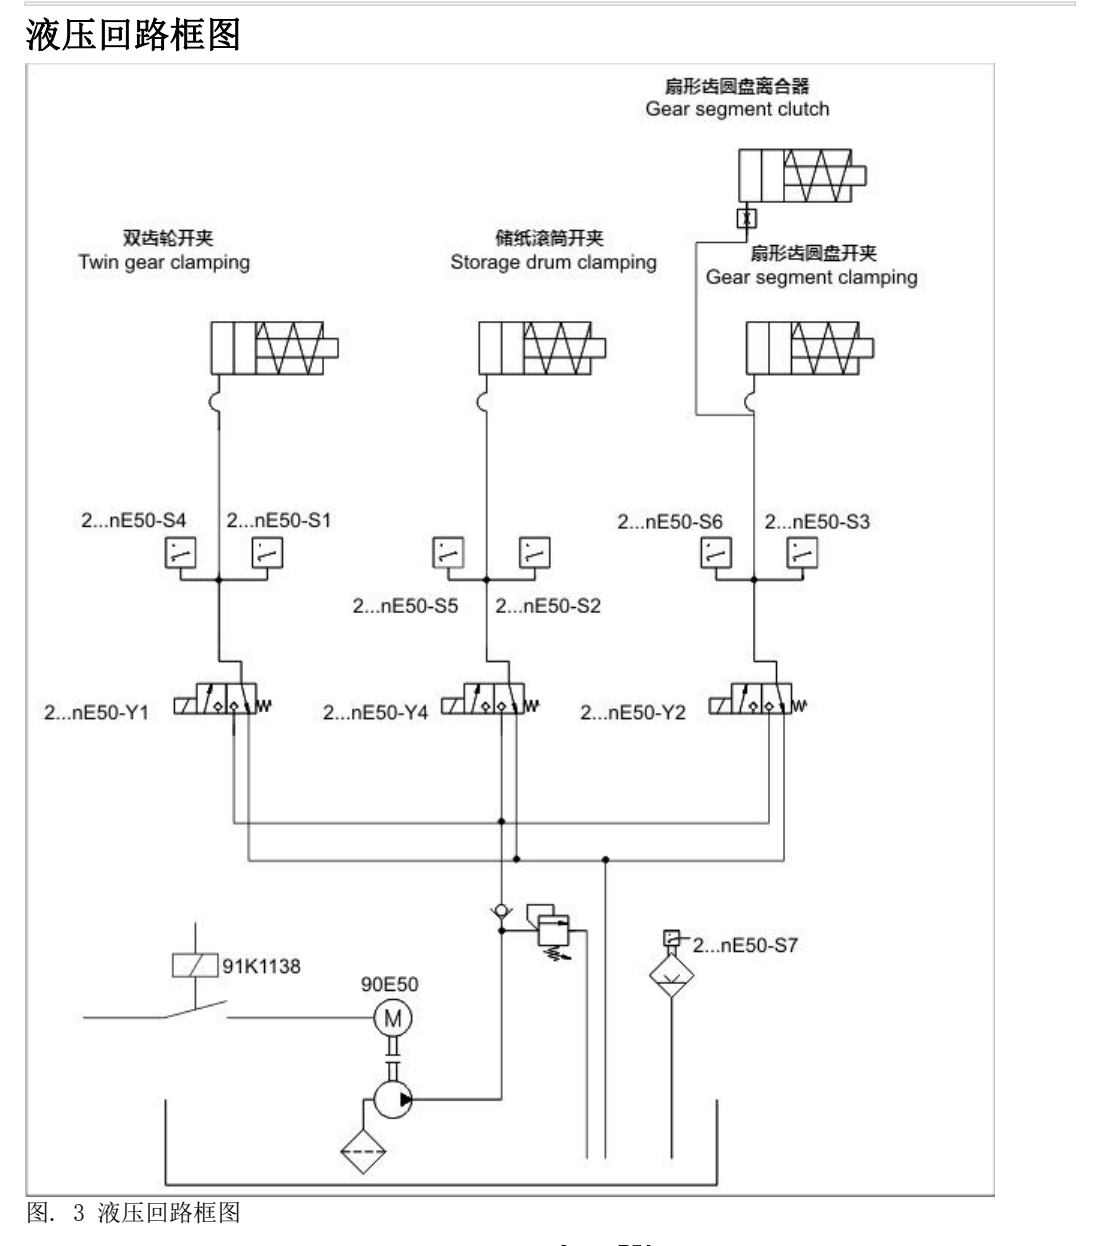
- Changeover between one-sided and two-sided printing is handled by three hydraulic clamps (twin gear, storage drum and gear segment, each opening only above 100 bar) plus a pneumatic detent and the reversing-motor clutch — and the first step is always servos centering the gripper margin.
- If the clamp gripper takes 0.3 mm less sheet in the one-sided position, it will take 0.3 mm more in the two-sided position, doubling the error to 0.6 mm at the impression cylinder: a bar tuned for straight work doubles its error after changeover.
- The nominal bar height is 105 mm or 67 mm, but each cylinder carries an engraved production deviation: a marking of +4 means the true distance is 104.96 mm, so the adjustment target becomes 67.04 mm.
- The Roland 700 perfecting device requires lubrication of the straight-printing and second-printing shaft pinions every 8 operating hours and cleaning of the bellows, suction-blow plate and sheet-guide rods every 200 hours — missing records are legitimate grounds for a price cut.
Reading the Reversing Hardware
A modern fully automatic reversing system is built around two cylinders: a double-diameter storage drum that absorbs format changes and briefly holds the sheet during inversion, and a single-diameter chrome-plated perfecting cylinder equipped with the clamp-gripper system. Supporting components include a double blowing nozzle bar, a sheet-observation sensor and Venturi guide boards that stabilize the sheet after it is flipped. When inspecting a machine, first confirm these two cylinders actually exist and function — some presses merely carry extra transfer drums with no true reversing capability, so the nameplate and the mechanical layout must be checked together.
The hydraulic side gives equally concrete criteria. The clamping circuit includes a pressure-intensifying unit with three low-pressure monitoring points that alarm below 10 bar; the three opening lines for the twin gear, storage drum and gear segment must each reach above 100 bar before their clamps may open; and a level sensor continuously watches the intensifier oil supply. During the demonstration, have the seller switch between one- and two-sided modes several times and watch how quickly pressure builds, whether any fitting weeps, and what the alarm history shows — far more informative than the paintwork.
The Changeover Chain and Its Weak Points
On a fully automatic platform the sequence from one-sided to two-sided printing is fixed. After the operator selects the changeover in the print material menu and confirms twice, the control system first drives the gripper-margin centering servos on both drive and operator sides (motors 1M63 and 1M64); it then energizes the valve that unlocks the detent on the perfecting cylinder; position sensors report the gripper bar state on dedicated inputs for the one-sided (port 100) and two-sided (port 101) positions; finally the reversing-motor clutch engages, coupling the motor to the storage-drum gear for positioning. Throughout two-sided operation, a sheet-loss sensor (port 97) monitors the handover between storage drum and perfecting cylinder, and three synchronization monitors watch the notched disc on the perfecting cylinder, the sensing plate on the storage drum and the segmented disc of the impression transfer cylinder — any lost signal interrupts the changeover.
On used machines three points fail most often: a drifting piston-position sensor that prevents the detent from seating, an aged optocoupler in the clutch circuit that lets the reversing motor drop out intermittently, and a poor contact on the maintenance-hood switch that makes the control believe the door is open and refuse the changeover. Do not settle for a single demonstration cycle — run at least three full round trips and confirm every status indicator appears in order.
The Doubling Rule of Gripper-Margin Error
This is the least intuitive acceptance criterion. Because the clamp gripper holds a constant closure angle while carrying the sheet, an angular offset beta at the handover behaves differently in each mode. In the one-sided position, a gripper arriving beta early closes late and takes less sheet; in the two-sided position the same offset makes it arrive earlier and take more. The error therefore reverses direction and doubles on its way to the impression cylinder: 0.3 mm short in straight work becomes 0.3 mm over after changeover, adding 0.6 mm to the front margin at impression. A press with perfecting must therefore be test-printed in both modes with the gripper margin measured on each — never accept a two-sided machine on the strength of a single-sided proof alone.
Engraved Deviations and Bar Adjustment
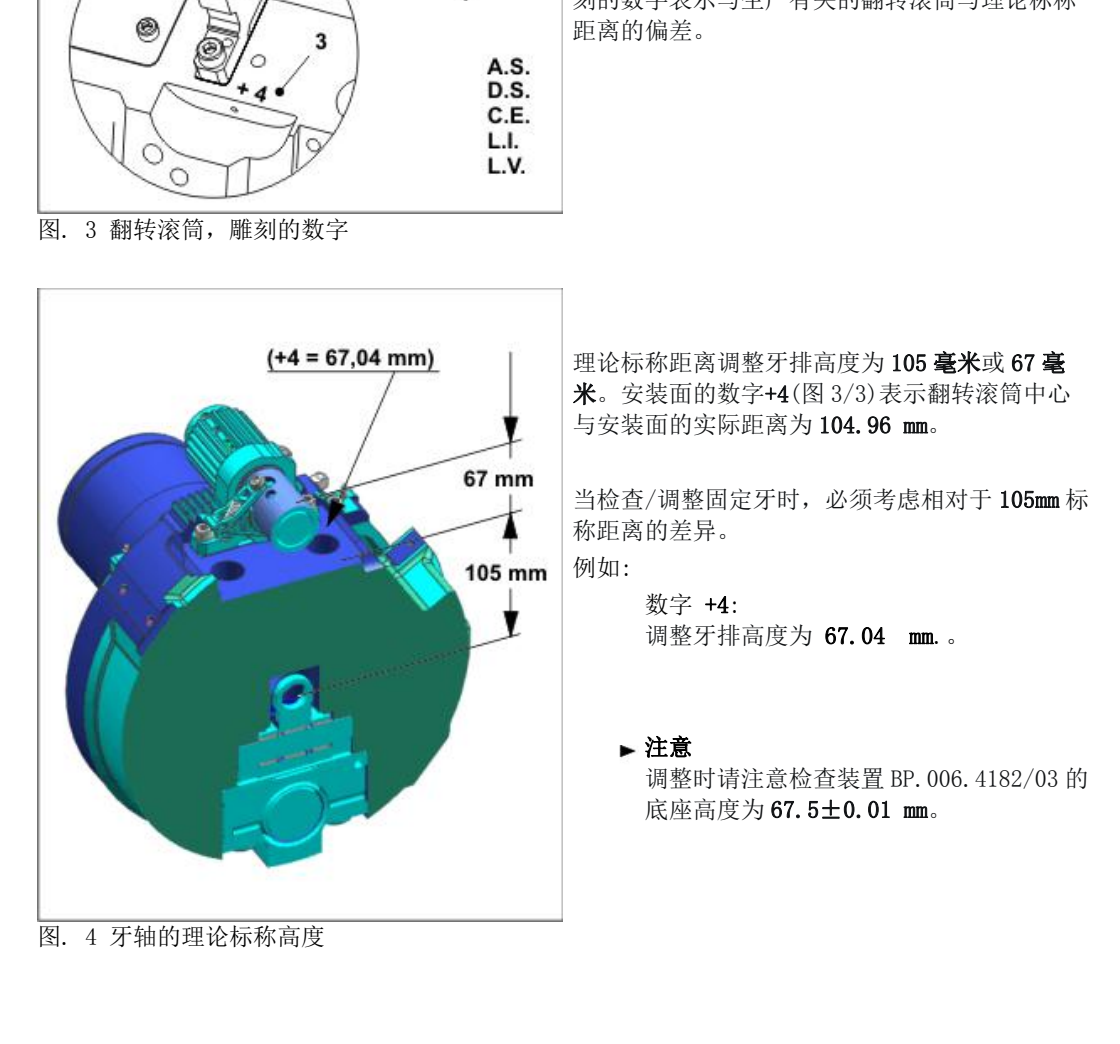
The nominal bar heights are 105 mm and 67 mm, yet every cylinder carries a small production-related deviation engraved beside the bearing block. A marking of +4 means the actual cylinder-center distance is 104.96 mm, so the bar should be set to 67.04 mm rather than a blind 67 mm. The same rule applies circumferentially: the nominal 36.50 mm between the groove and the support tube becomes 36.48 mm with an engraving of +2. The dedicated gauge has a base-height tolerance of 67.5 plus or minus 0.01 mm. Before arguing about measured deviations, locate these engravings — otherwise a reading may simply reflect the machine's own legitimate reference. Remember the bar carries 19 gripper pairs, the fixed jaws driven from the drive side and the spring-loaded jaws from an outer shaft on the operator side; backlash or noise in either gear housing belongs on the inspection list.
Maintenance Intervals and Price Negotiation
The perfecting device has its own maintenance rhythm; the Roland 700 schedule, for example, is graded in five steps by operating hours:
| Interval | Task |
|---|---|
| Every 8 operating hours | Lubricate the straight-printing and second-printing shaft pinions; wipe excess grease from the sheet-guide circuit bearings and nipples |
| Every 200 operating hours | Clean the bellows, suction-blow plate, sheet-guide rods and guide bars |
| Every 1,000 operating hours | Lubricate the connecting levers of the swivel and gripper shafts, the clamping-cam tracks, cam rollers of guide rollers and suction pipes, swivel-pipe supports and return springs |
| Every 2,000 operating hours | Have the slip rings of the rotary transmitter inspected by service personnel |
| Every 5,000 operating hours | Lubricate the bearings of the straight- and second-printing swivel shafts |
| Annually | Even below 1,000 operating hours per year, lubricate the entire reversing unit once |
The automatic oil pump runs a special long-term product with a viscosity of 28,000 to 30,000 mm²/s, consuming roughly 3 to 4 liters per year depending on the model. When reviewing records, focus on the 8-hour and 200-hour items: a dust-caked suction-blow plate or dry guide rods betray long-term neglect, and worn cam rollers and jaw parts will only follow.
Common Misjudgments and an Acceptance Checklist
Three mistakes dominate. First, buyers treat a straight-printing trial as the whole story and ignore the doubling rule — then two-sided work never quite registers half a hairline. Second, occasional sheet loss in two-sided mode is blamed on the paper when the real culprit is a drifted sheet-loss sensor or fouled Venturi guide boards, both fixable with cleaning and calibration. Third, the hydraulic level and weeps are ignored; a bypassed level alarm eventually starves the clamping circuit, and insufficient opening pressure scores the clamp faces — damage that cannot be economically repaired. A practical acceptance routine: print one version in each mode and measure the gripper margins, run three full changeovers watching the status sequence, verify all three 100-bar opening circuits and the level alarm, review the 8-hour and 200-hour maintenance records, and bar-turn the machine to listen to both gear housings.
Conclusion: A used press with perfecting is well worth buying — provided you inspect it by the logic of the reversing system itself: the genuine presence of the double-diameter storage drum and clamp-gripper bar, the health of the three 100-bar hydraulic clamps, the doubling rule of the gripper-margin error across changeover, and the visible traces of the 8-hour and 200-hour maintenance. Verify those five and you capture the true value of the perfecting unit in the price.


